Direct manipulation of abstract syntax trees part 1: Representing and manipulating trees
This is the second part of a two part post. Part 0 is here.
Background
The PLAAY language is a visual language. The editor for PLAAY allows users to modify abstract syntax trees of PLAAY programs by direct manipulation.An earlier post focussed on the user interface from the users' point of view. Here we look at the software design behind the GUI.
Valid trees
Code in PLAAY is a tree made up of nodes of various kinds. Each kind of node has restrictions on what its children can be. For example many kinds of node aren't allowed to have any children at all. A node representing a function call must only have children that are expressions. A node representing a while expression must have exactly 2 children and the first must be some kind of expression and the second must be an expression sequence. Expression sequence nodes can have any number of children, but each must be either some kind of expression or a variable declaration. A valid tree obeys all these restrictions and the PLAAY editor is only capable of producing valid trees.This idea of valid trees is essentially the same as XML's idea of valid documents.
The validity rules are PLAAY equivalent to the syntax rules of text based languages. Since the editor can only produce valid trees, it is impossible, in PLAAY, to make a syntax error.
There is one loophole. Where the program is not finished, we allow a "placeholder" node to be placed. For example, as I mentioned, a while expression must have an expression as its first label. By default, this is an expression placeholder node, although as we will see later, we can create the expression first and then create the while node later, in which case we never need the placeholder.
Program nodes and tree nodes
Each tree is represented by a program node (PNode) which has a label and a sequence of 0 or more children. PNodes are immutable and may be shared, so they form a directed acyclic graph. It's a precondition of the PNode constructor that it is valid and the precondition is checked at run time so the error of making an invalid tree is quickly found during testing.Also we generally make trees through a method tryMake
tryMake(label:Label, children:Array<PNode>):Option<PNode>The type Option<PNode> has values that are either None or Some(p) where p is a PNode. So the code that tries to make a PNode with this method has to deal with cases where the node would have been invalid. Option is a monad so we can use monad operations like bind and map to deal with the results of tryMake and similar functions.
Here is a tree.

The blue ellipses are expression nodes. The yellow square is an expression sequence node.
On the screen this tree is displayed as a set of nested boxes like this:

You can see that each expression node is displayed as a box. Expression sequences are not displayed, though their children are.
Since PNodes and labels are immutable, we can use the same PNode to represent multiple nodes in a tree. The illustration below shows two equivalent representations of the same tree in terms of PNode objects (triangles), Label objects (squares), and arrays (rectangles). Other than the amount of space they take, these representation are treated as equivalent.

A node in the tree represented by a PNode p can be represented by p and a path from the p to the tree node. For example if p is the node labelled by * in either of the structures above, the 7 tree nodes in the tree represented by p are (p,[]), (p, [0]), (p, [0,0]), (p, [0,1]), (p,[1]), (p, [1,0]), and (p, [1,1]).
If a tree node has n children, then there are n+1 positions under it. Here is a tree and all the positions in it. The dotted lines simply show which tree node is associated with each position.

So a position consists of a tree node t --called the parent-- and an integer k such that 0 ≤ k ≤ n, where n is the number of children the tree node has. For example the second position under the node labelled + on the right is ((p, [1]), 1) where p is the PNode at the root.
There are no objects in the data structure representing positions. However when we render the tree into HTML, some positions are represented by HTML elements called drop zones. Drop zones are usually invisible, but light up when the mouse hovers over them. Also, as explained below, when the current selection corresponds to a position, the drop zone --if any-- for that position is shown in grey.
Why immutability?
At this point you might wonder why I chose to use immutable objects to represent trees.There are several reasons, but two stand out: correctness and simplicity.
Correctness: As mentioned above it is an invariant of PNodes that they are valid. In order to enforce this invariant we check that it is true on construction. Since nodes and labels are immutable the invariant can never become false. With a mutable structure we could enforce the invariant by checking that it is respected after every mutation. However what can we do when the assertion fails. At that point it is too late to recover. So for each mutator we need to write code that will predict whether the change will succeed or fail. For example if I have a mutator that replaces children i to j of a node with a new set of children. I might write methods in PNode like this
    public canReplace( tn : TreeNode, i : int, j : int, nodes : Array<PNode>) : boolean {
        ... }
    private replace( tn : TreeNode, i : int, j : int, nodes : Array<PNodes> ): void {

        ... }
    public tryReplace( tn : TreeNode, i : int, j : int, nodes : Array<PNode>) : boolean {
        if ( canReplace( tn, i, j, nodes ) ) {
            replace( tn, i, j, nodes ) ;
            return true ; }
        else return false ; }
Now this style of coding can be made to work, but I have three problems with it. First, I know that when other people use this interface, some of them are going to ignore the result of tryReplace. The use of Option objects in the current design makes it more difficult to ignore the possibility of failure. Second, the whole scheme rests on getting the implementation of the mutator and the predicate to be completely coherent, i.e. the can function should be true exactly if the mutator will succeed. This is easy simple cases but rapidly gets complex as the complexity of the mutations increases. Third these changes are not composable. Suppose I have an edit that consists of two changes in sequence. How can I know whether the second will succeed before doing the first? And if I do the first, how can I get back to the original state if the second will not succeed. To answer the last two questions, we could use a command pattern based undo/facility with composable commands. However that is another level of complexityA bonus from using immutable structures is that undo/redo is very easy and efficient. We simply keep two stacks of PNodes. Actually, we keep two stacks of Selections objects; Selection is another class of immutable objects and is discussed next.
Selections
A selection is a pair of positions. We restrict these positions to having the same parent, so it might be better to say that a selection is a tree node t and two integers a and f such that 0 ≤ a,f ≤ n where n is the number of children t has. The numbers a and f are called the anchor and focus. The minimum of a and f is called the first and the maximum the last. When a=f, a selection just indicates a position. When a ≠ f, there is a nonempty set of tree nodes that are called the selected nodes. The number of selected nodes is the last minus the first.Selections can be represented by triples consisting of a tree node, the anchor, and the focus.
For example, here is a selection with 0 selected nodes ((p, [0]), 2, 2)

A selection with one selected node ((p,[]), 0, 1)


The editor does not create a drop zone for every position in the tree, only those where it makes sense to insert a tree. There is a drop zone in the example above because addition nodes can have three children. While they are technically valid, we avoid creating selections corresponding to positions that don't have drop zones; such selections aren't needed and are would be confusing to the user.
In the code, we represent selections with a class Selection, which is immutable and such that all the restrictions are checked at construction time. Selections are guaranteed to be valid.
Edits on selections
Another key concept is that of an edit. An object of type Edit<Selection> is an object that represents a function from Selection to Option<Selection>. (In general, for any type A, an Edit<A> object is an object that represents a function from A to Option<A>. We're only interested in the case where A is Selection.) There are two operations on edits, applyEdit takes a selection and returns an Option<Selection>, and canApply is a function that takes a selection and returns true if applyEdit would succeed. I.e.!e.canApply(s) iff e.applyEdit(s).isEmpty()The only advantage of canApply is that it might be quicker to call canApply than to call applyEdit and see if it succeeded.
The nice thing about edits is that we can compose them in various interesting ways. For example
- Applying compose(e, f) applies e and then applies f to the result. Of course, if either application fails, the application of the whole edit fails.
- Applying alt( [e, f, g] ) applies the first edit in the list that succeeds.
Some example edits
Replace-children edits
A replace-children edit attempts to replace the selected nodes with a fixed list of trees. If there are no selected nodes, it simply attempts to insert the list of nodes at the given position. For example if the list of trees is
and we apply the resulting replace edit to the selection

the resulting selection is


it would fail, because assignment nodes with 3 children are invalid.
Engulf edits
Engulf edits are built out of selections called templates. Suppose we start with a template
and we built an engulf edit out of it; the engulf edit applied to a selection

results in a selection

- First replace the selected nodes of the template selection with the selected nodes of the target selection to make a temporary selection.
- Second replace the selected nodes of the target selection with the root of the temporary selection.
- Third, the path, anchor and focus are adjusted so that the selection corresponds to the position after the last node inserted into the temporary tree.
Engulf or replace
A number of GUI actions are associated with edits that choose between an engulf or a replace based on a particular template. For example the ':' key is associated with an edit that either engulfs with the templateor replaces the current selection with the tree from the same template. In either case, there is an optional movement edit --movement edit are discussed below-- after the replace or engulf.
Similarly the +, *, -, =, <, and > keys are associated edits that engulf or replace using calls to the appropriate function. The ?, @, and \ keys engulf or replace with templates for, respectively, an if expression, a looping expression, and a lambda expression.
The choice between replace and engulf is made as follows. If every selected node is a place holder (including the cases where there are no selected nodes), then replace is preferred. Otherwise engulf is preferred. Of course, if the preferred edit does not succeed, the other edit is tried.

If one expression x (which is not a placeholder) is selected, pressing @ will engulf that x with the first (left) template so that x becomes the guard. However, if two more more expressions are selected, the tree from engulfing with the first template would be invalid (it would result in a tree with 3 or more children under a while loop node, which is invalid). Instead the two expressions are engulfed with the second template so that they become the body of the while loop. This sort of thing is easy to do using the alt function. For example the code that creates an edit to try engulfing with each of an array of templates looks like this
    const editList : Array<Edit<Selection>>
      = templates.map( (template) =>
                       new EngulfEdit( template ) ) ;
    return alt( editList )  ;
Movement edits
There are several classes of edits that only affect the path, focus, and anchor. These are used in the PLAAY editor to implement, among other things, the response to pressing the arrow keys. For example, if the selection is a shown on at the left, pressing the right arrow key four times will move through the sequence shown here. The right arrow edit only stops when the position corresponds to a drop zone. In the example, that explains why it skips the positions under the 3 and the x node.The space bar is used to select the parent. For example the edit associated with the space bar will take the selection on the left below to the selection on the right:

The tab key is associated with an edit that attempts to move the selection to the right until a suitable place for insertion is identified. Suitable places for insertion are either positions where there is a drop zone or selections where there is one selected node and it is some sort of placeholder node. An exception is that drop zones that occur just before or after placeholders are skipped. Some tab edits are shown below

Open and closed labels
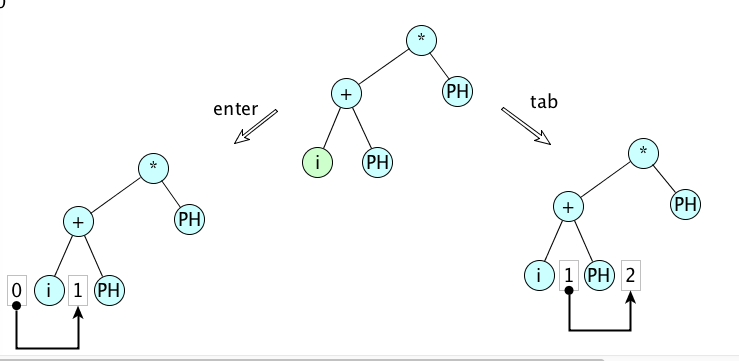
Several classes of labels are associated with a string and these labels are capable of being in two states, open and closed. Open nodes are rendered by the GIU as text fields. Typing a letter, say 'a', attempts to insert an open identifier node with a string value of "a". Subsequent characters typed go to the text field and, when the text field is closed, the label is updated and closed. Numbers are entered in a similar way. Function calls are entered in almost the same way; typing a '`' creates a new function call, but the name of the function is empty.The text field can be closed by typing an enter or a tab key. If an enter key closes an open node, then that node (now closed) will the selected node. If a tab key closes an open node, a tab edit is added on, so there will be a search for the next suitable place for an insertion. The figure below shows the distinction between an open node (green) being closed with an enter versus a tab.
This distinction turns out to be very useful for entering expressions in either infix or prefix order.
Other useful edits
Some other useful edits include moves and swaps. Both of these make substitutions at two points in the same tree. We need moves and swaps since breaking these edits down into constituents may cause the tree to become invalid temporally and that is not allowed. For example we can swap child 1 with child 2 of an if-node. (Equivalently we can move the child 1 to position 3.) These are both legal edits. But achieving the same result by a sequence of simpler edits will usually not work. For example duplicating the child 1 to make a fourth child and then deleting the child 1 would mean that the if has 4 children at one point in time and this is an invalid tree.Another category of useful edits expands the selection in some way. In the editor, these are attached to pressing arrows while the shift key is held down.
No comments:
Post a Comment